Showing posts with label Fall. Show all posts

Sunday, October 13, 2013

The Lazy Way to Apple Pie


Apple crisp is easier, less fuss, and, in my opinion, just as delicious (if not more so) than apple pie.  The method is simple: peel and chop some apples, throw them in a dish with a little water or lemon juice, sugar, and cinnamon, and stir.  Top this with a crumble that comes together in about 2 minutes and throw in an oven until browned and bubbling.

That's it.

Over the past couple weeks, I've taken to buying apples at the farmer's market.  The problem is, every week I try a new apple and every week I find myself eating through mediocre apples that aren't up to my (exacting) standards of crispness and sweet-tartness.  This week, however, I picked up some Snow Sweets and THEY. ARE. AWESOME.  Pure white on the inside, extremely crisp, sweet with a hint of tart.  Sort of like honeycrisp but with more character.  I won't have any trouble eating all of these out of hand, and bonus: I had a handful of the previous week's apples left in my crisper drawer.  Apple crisp it is!

---
Apple Crisp

Ingredients
6-8 small/medium apples, peeled and chopped (enough to fill your baking pan of choice)
1/4 c. sugar
approx. 2-3 tsp cinnamon
pinch of salt
splash of water, lemon juice, or apple cider vinegar

1/2 c. flour
3/4 c. oats
1/4 c. sugar
pinch of salt
1/3 c. butter, cut in slices

1. Preheat oven to 375.  Peel and chop apples and combine with sugar, cinnamon, salt and liquid in a baking dish.

2. In separate bowl, combine flour, oats, sugar, and salt.  Work butter into flour mixture with your hands until crumbly and clumpy. 


3. Dump crumb mixture on top of apple mixture.


4. Bake until browned and filling is bubbling, somewhere between 30-45 minutes.


5. Serve with vanilla ice cream or frozen custard!

Saturday, September 29, 2012

Fall Means Apple Butter

When I was little, my mom and I made apple butter every year.  There was a specific ritual to it: we'd go to the apple farm to get a good deal on a huge bag of apples (a peck? half a bushel?), make sure we had new lids for the canning jars, and got to work.

My job was to cut up the apple quarters into tiny pieces.  One of the first times I remember being allowed to help, I must have been maybe seven years old.  My mom and Gammy were much faster--one of them would quarter, core, and peel the apples while the other would chop.  My "job" was really just to keep me busy, I'm pretty sure.

After the invention of the slap-chop thingamajigger, my job became much more important.  Mom would keep the apple quarters coming, and I would slam the handle down in rapid-fire mode until the apple pieces were pulverized.  

The rest of the day only got better from chopping apples.  We would make our apple butter in huge batches in a Nesco turkey roaster oven so that we had enough to give as gifts and to eat all year long, and once all the ingredients were cooking I got to lift the lid periodically and take the longest-handled spatula we owned to stir the bubbly, spicy, molten apple lava.

The end of the day was the best part, though.  If you make apple butter, there is absolutely no way to know that it has been properly made unless you taste it on homemade bread.  Once the apples had been cooking for a long time--usually early afternoon--Mom would make a couple loaves of country white bread. She had a knack for timing it so that the loaves were cooling while we sterilized and canned the apple butter.  There always seemed to be the right amount left for a bowlful of scrapings that we dipped into with spoons, smearing the mahogany-colored preserve over the fresh bread.

The jars of apple butter we processed in a hot water bath for ten minutes, taking them out and letting them cool upside down on a towel on the counter top.  After an hour or so we turned them right side up and I always tried to listen for the pop as the cooling air inside the jar set the seal.

This ritual of making apple butter was so ingrained in my experience of fall that when I went to college freshman year, I woke up one September morning craving apple butter.  When I called my mom a few days later, she actually told me that she had made her yearly batch of apple butter that weekend!  Somehow I must have known it was an apple butter day, even four hours away from home.

If you have a crockpot, apple butter is a cinch to make--prep it in the afternoon and let it cook on low all night, and you can make bread in the morning and have it for breakfast.  If you make it on the stove, it only takes a couple hours for it to come together (and less if you have friends to help you chop apples).

Apple Butter
makes 7 or so jars

1/2 peck + a few apples, any kind*
1/4 c. white vinegar
3-4c. sugar
4 T. cinnamon
1/4 tsp ground cloves
1/4 tsp salt

Quarter the apples.  These are Golden Delicious
from the farmer's market.
 
1. Peel, core, and chop the apples to small-to-medium pieces.  The bigger the pieces, the chunkier the final product.  If you like yours thick and spreadable, chop the apples smaller.

Seems like I've cut up so many!  Not nearly enough.
Keep going!

This is half a peck of apples, quartered.

This step takes a while.  Cut out the core from each
quarter and peel them.  I ended up using this many plus another 1/3 of this bowl of apples--enough to fill my dutch oven.

Chop the apple quarters into small pieces.  I cut them
lengthwise into thirds or fourths, then chopped them crosswise.

 2. Put all the apples in either a large crockpot or a dutch oven.  Add the vinegar, sugar, and spices to the apples and stir until the spices are well-distributed.

Add the other ingredients to the apples and turn on the heat to medium.
3. If using a crockpot, turn on high until it starts to bubble, then switch to low heat.  If using the stove top method, turn heat to medium.

It only took a couple minutes for them to start getting juicy!
 4. Cook in the crockpot on low overnight or on high 8-ish hours, until the apple butter has reached a pleasing consistency (up to you) and color.  You might have to switch to high heat and take the lid off to evaporate some of the liquid and make it thicken up.

Stove top method: once the apple juices are bubbling, turn the heat to medium-low and stir frequently to prevent bubbling over.
Bubble, bubble, bubble.  Be sure to stir every 5 minutes or so
or you might get scorched apple butter on the bottom.

This is maybe an hour in.  It's cooking down a lot and
the apples are getting softer.
 5. Once some of the liquid starts to evaporate, check out how the consistency is coming along.  If the apple butter is getting thick without changing to a deep cinnamon-brown, you can add a little water, put a lid on the dutch oven, and turn the heat down lower to give it enough moisture to cook for longer.  If it's coming along nicely, skip that part and let the juices cook out until you get a consistency you like.  Be aware that as the liquid evaporates, you'll need to stir more frequently to prevent scorching.

(Almost) finished!  It reduced in volume by about 50%.
I let it cook a little longer with the lid on, on very low heat,
so that the bigger pieces softened up and the butter looked darker.
6. Once the apple butter is done, you're ready to go!  You can can it at this point--and if this is your plan, while the preserves are cooking you might want to wash and sterilize your jars in a big stock pot of water so that hot apple butter goes into hot jars.  Otherwise, you can keep the apple butter in the fridge for a reasonably long time (several months--like a jam.  The sugar/vinegar/cooking helps preserve it).  I have trouble getting jars of apple butter to last that long, though.  This recipe made enough for 7 peanut butter or regular jelly jars (I recycle the glass ones--they make great pantry containers).

7. Enjoy the scrapings from the pot (or whatever won't fit into your jars) on a slice of fresh bread.  Or, you could get a nice rustic loaf from the bakery/store and toss it in the oven on low for a few minutes to warm it up.  If you're feeling super-nice, share with friends.  Otherwise, hoard it til next fall.

Tuesday, November 1, 2011

Walnut tart

First off, a disclaimer: I am from Missouri.  In Missouri, we call that the Midwest, but here in Wisconsin people say I'm from "the South," rolling it in their mouth a little to make it come out softer and with a drawl.  In retaliation (or maybe just reflexively), my words come out a li'l more slurred together, I start droppin' g's and syllables an' stringin' ever'thin' all togetha an' gen'rally livin' up t' th' expectations they already have 'bout the South.

Anyway.

The South has lots of great culinary traditions, things that I didn't realize were so embedded in my food culture until I moved away and found out that biscuits and gravy is not, in fact, a given at a breakfast joint, or that Waffle House is not on every highway exit, or that chicken-fried anything but chicken was confusing and needed to be explained.

One of my favorite dishes that make me think of home is pecan pie: ooey, gooey, cloyingly sweet with the generous crunch of pecans and a plain crust for a counterpoint.  Pecan pie has a poor cousin, though, that's equally delicious--the chess pie.  Chess pie is basically pecan pie without any pecans.  Sugar, eggs, butter, all baked together in a pastry crust until the custard is set.  I ran into a few variations of the chess pie via The Kitchn and quickly realized that this is probably the easiest pie to have in your arsenal.  Mix it up, throw it in a crust, bake: no need for slicing, dicing, fruit-pie thickeners, or lattice crusts.  Simple.


So, when I was craving something sweet and wanted to try out my new tart pan, here's what I did.  I used the basic recipe for chess pie here (and general ideas about pie crust from David Leibovitz here) and decided to ramp it up with some walnuts.  Then for good measure, I added chocolate chips.  Jus' cause, y'know?
Ooh, look!  A shiny new tart pan.  I brushed it with oil before
I started because it needed a li'l something to get it all seasoned this first time.

Walnut Tart
Crust
1c. flour
1-2t. sugar
pinch salt
4-8T. butter

Combine flour, sugar, and salt.
Cut the butter into chunks and work into the flour.  You can use a pastry cutter or a food processor or your fingers.
Add about 1/4 c. ice-cold water and mix.  Add cold water 1T at a time until the dough comes together and sticks to itself to form a ball. Cover and throw in the fridge to chill while you mix up the filling.

Mmm, walnut filling!
Filling
3/4c. brown sugar
2T. butter, softened
2 eggs
~1 c. walnuts, chopped

Cream the butter and sugar, then add eggs one at a time, mixing well between each egg.
Stir in the walnuts.

Now--make the tart:
Preheat the oven to 350F.
Pull the crust out and roll it out, or if like me you somehow didn't do it right and it's kind of crumbly, press it into the tart pan until the bottom and sides are covered evenly.
Operation: crust-in-pan is a success!
Pour the walnut mixture into the crust.
Sprinkle the chocolate chips over the top so they're dotted everywhere.
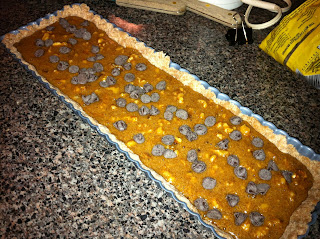
Are those...are those chocolate chips on top of that tart?  Why yes, yes they are!
Put the tart pan on a sheet pan so it's easy to pull out of the oven and bake for 35-40 minutes or until golden brown and puffed and set.
The chocolate chips kind of sink into the rest of the filling,
but don't worry!  They're there.
This is the hard part: let it cool before you eat it!  Or wait until it's partially cooled and cheat, like me.